Coloring Bookmarks Tutorial

We hope that you’ve enjoyed the recent coloring tutorials we’ve posted on using white gel pens, colored pencil and crayon for the Starry Night/Galaxy coloring technique, coloring gems and  crayon-resist method.

One more way to use white in your coloring is to add embellishments on your coloring page or craft projects with stippling, doodling or adding squiggles and similar accents.

Donna Pecoraro has created several beautiful bookmarks from the coloring bookmarks sets we have for instant download from our Gumroad store. When we saw the first set she made, we knew we had to ask her how to put a lovely project together. Here it is straight from Donna…Enjoy!

COLORING BOOKMARKS TUTORIAL:

Materials needed:

Coloring bookmarks (If you wish, you can also cut up colored pages to your desired bookmark size):

Rose – https://gum.co/jeWr

Believe – https://gum.co/mTCYG

8 – https://gum.co/uTekq

Cardstock

Glue

Scissors

Ribbon

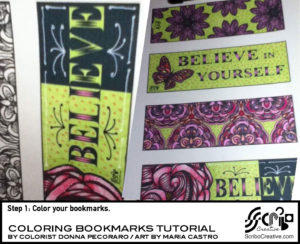
Step 1: Begin by coloring your page. You can choose any medium. I’m doing this set for my teen daughter who loves this color combination. Here, I combined pencil, markers, and white gel pen.

Here is the completed page, ready to be crafted into bookmarks.
 

scribo_bookmktutstep1

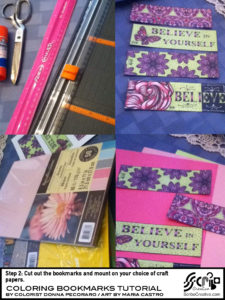
Step 2: Cut out the bookmarks and mount on your choice of craft papers.

I get lots of colored cardstock from my local craft store, so I have a stash of quite a few colors that I use for card making, scrapbooking, and projects like this one.

I’ve taken a few sheets of paper out that I think might go well with the color scheme, and placed the bookmarks on them to see how the colors react to each other.

The tools you will need are simple. The key is to be as neat and precise as possible.

To cut the mounting paper, you can measure with a ruler and make a fine pencil line on the opposite of the paper so it can be erased later and won’t show.

Or, if you own a paper cutter, you can simply insert the paper, judging what amount of border you will want to leave around the bookmark.

Here are the bookmarks, all cut out and ready to be mounted.
scribo_bookmktutstep2

Using a glue stick, I’ve attached the bookmark to the mounting cardstock. Remember to leave extra space at the top of the mounting paper so that you can punch a hole for adding a ribbon if you like.

There are so many papers available, here I’m using a book of papers and picking a pinkish striped one to mount the bookmark.

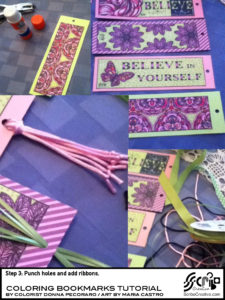
Step 3: The bookmarks are all mounted, with holes punched.

A bit of ribbon threaded through the hole adds a nice touch to the bookmark. Here are some possibilities  picked out from my ribbon stash.

You can purchase narrow ribbons very cheaply from craft stores, the one on the spool was just 50 cents from Michael’s Crafts. I’m also considering using satin cording here.
scribo_bookmktutstep3

Step 4:  And here they are, completed! I knotted the satin cording to prevent unraveling and add interest. With the black cording, I knotted in some lightweight beads. Anything goes!

You can also laminate the bookmarks or even cover with clear Contact paper before adding the ribbon to make them sturdier.

Maria Castro has several sets available for every taste. They’d make a lovely party favor for a book club meeting, or a great addition to the gift of a book!
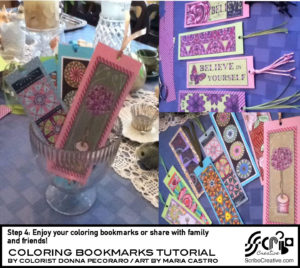
scribo_bookmktutstep4


We would like to thank Donna Pecoraro for sharing these tips with us. Want more? Make sure you subscribe to our enews for freebies, tips, coloring inspiration and exclusive deals: https://www.scribocreative.com/enews/

Don’t forget, if you use white in any of your Color My Moods coloring projects, you can join our September Challenge and have a chance to win white Gelly Roll or Uni-ball pens. Visit us on Facebook: https://www.facebook.com/ScriboCreative/posts/629300680565572:0

Enjoy your coloring bookmarks or share with family and friends!
Starry Night Tutorial

We’re big fans of Vermailene Barrios’ beautiful vibrant coloring and we’re excited that she shared her Starry Night technique to our colorists.

The coloring page featured in this tutorial will be part of our floral themed Bible-verse based coloring journal to be released in October.

This particular page will have the verse Love is patient, Love is kind. If you would like to be notified when the book is available on Amazon, email info@scribocreative.com with the subject line “Coloring Journals” [*Update: Blessings in Bloom is now available on Amazon and Gumroad: Color My Moods Blessings in Bloom Gratitude Coloring Journal – http://amzn.to/2enxOT3, PDF version on Gumroad: https://gum.co/UIehu].

In the meantime, this demo page is available on our Gumroad store for instant download: https://gum.co/tUsb.

STARRY NIGHT TUTORIAL:

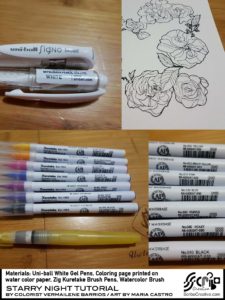
For optimal results, Vermailene recommends the following materials (shopping links are listed at the bottom of this post for your convenience):

Coloring page printed on watercolor paper

Zig Kuretake Clean Color Brush Pens

Zig Detailer Watercolor Brush

Uni-ball Broad Point White Gel Pen

Uni-ball Fine Point White Gel Pen

VerTutMatSt

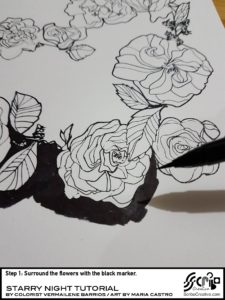
Step 1: Surround the flowers with the black marker.

VerTutStep1

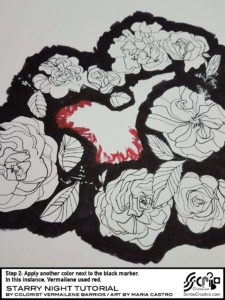
Step 2: Apply another color next to the black marker. In this instance, Vermailene used red.

VerTutStep2

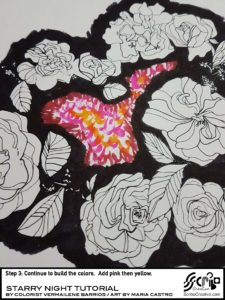
Step 3: Continue to build the colors. For this example, color in with pink then yellow.

VerTutStep3

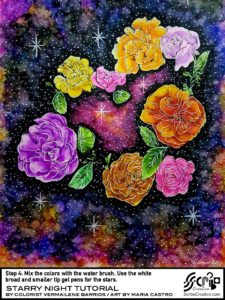
Step 4: Mix the colors with the water brush.

Step 5: Use the white broad and smaller tip gel pens for the stars. “Dot” the stars all over and even add some sparkly ones like what Vermailene did in the example.

You now have a breathtaking “Starry Night” background! Follow Vermailene’s beautiful art at:

Instagram: vermailenebarrios

Facebook: https://www.facebook.com/verbarriosPH/

VerTutStep4

Products used for this tutorial:

Maria Castro of ScriboCreative.com is a participant in the Amazon Services LLC Associates Program, an affiliate advertising program designed to provide a means for sites to earn advertising fees by advertising and linking to Amazon.com.


Crayon Resist Tutorial

This coloring technique has been one of my favorites since I was a child. The way it works is that the wax/oil and water don’t mix so when you go over the crayon with your watercolor, you’ll still be able to see the design you colored with the crayon.

You can experiment with different crayon colors but my favorite is white. I’ve also used watercolor pencils but you can use any watercolor you like.

The coloring page is from Color My Moods Garden Mandalas available on Amazon http://amzn.to/1VG5rms or Gumroad: https://gum.co/wrBlN.

For this demo, I tried coloring straight from the coloring book but I made sure that I had couple of cardstock underneath to prevent water from seeping through the next page. It can work but if you’re able to print on watercolor paper, that would be best.

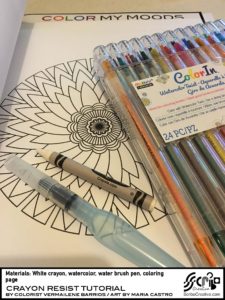
Materials:
Coloring page
White crayon
Watercolor or watercolor pencils
Watercolor brush

CrayonResTutMat

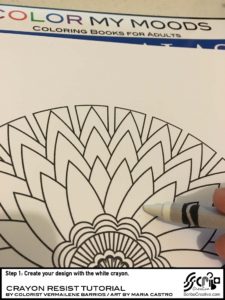
Step 1: Create your design with the white crayon. Remember, this would “resist” the watercolor  and the area will remain white.

CrayonResTutStep1

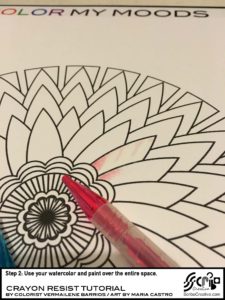
Step 2: Use your watercolor and paint over the entire space.

In my case, I used watercolor pencils to color the area (you will feel the wax from the crayon and you can color around it). Wet with the brush pen.

CrayonResTutStep2

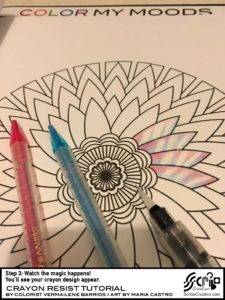
Step 3: Watch the magic happens! You’ll see your crayon design appear.

You only need very little water. It’s best to start with just a damp brush versus risk soaking your page.

Have fun!

CrayonResTutStep3

Products used in this tutorial: